


Step 1
Get
an appropriate sized board for your character/sculpture you've created. Then
add a thin layer of clay onto the board, so that the sculptures weight can be distributed
evenly. Because the next step may create some pressure onto the sculpt,
possibly flattening the sculpt in various places. Which would not be good after
all that time and effort you put into creating your finished sculpt.


Step 2
Place
your character onto the board, and begin to build up the clay half way around
the entire sculpt. Take greater care around the hands when doing this step,
because you need to make sure the clay is all around the fingers with no gaps.
Because when poring the plaster mix it will go underneath your sculpt possibly ruining
your mould.
TIP: An
easy way to do this is to measure and ink a half way line all around your
sculpture as a guideline.


Step 3
For
casting the feet (especially if your armature has metal plated feet) it is important
to build up the feet with clay, as the mould will recreate this aspect. And the
armature plates can then be aliened correctly onto the mould ready for adding
the foam latex.


Step 4
Once
the clay is completely covering half of the sculpture, as show in the left
image. You need to go round the entire sculpt with a sculpting tool, too smooth
the edge of the clay. Ensuring there are no gaps between the sculpt and the
clay. As shown of the right image.


Step 5
Now
the clay base is constructed around the sculpt and completely water tight. It’s
time to construct a box around the sculpt, as shown on the first image (left).
To make the box more stable, tie string around the wooden blocks and applying
large amounts of clay at the seams of the box. To make the box water tight,
ready for the plaster that will be added.
The
box is now ready for the next step, add clay inside the box all around the seams
to again make water tight (as shown in the right image ). Once done gently
create little circular indents with your thumb. This will create slots for your
mould, helping to align the two parts of the mould. I also add blocks of clay, these
areas will create an where you can prise apart the two halves of the mould.
Step 6
Now
the sculpt and box are completed and water tight, it is now time to add the
plaster to create the first half of the mould. Before this though, a soap
solution is covered over the entire area to help separate the two parts of the
mould.


Step 7
Mixing
the plaster: First I placed 10 pints of water into a bucket, and then added
15lb of plaster. Now mix the solution until smooth, approximately 4 minutes.
Once smooth keep testing the thickness of the solution by removing your hand to
see if the solution is white and looks like a sleeve. When thickened slowly and
gently add the solution to the box. Once poured gently rock the table or box, to
remove any air bubbles off your sculpt. The left image indicates I didn’t have
enough plaster, as you can quite clearly see the belly and nose. A common
problem with large and bulky sculptures. So I made another mixture of plaster
only 6 pints of water this time, again rocking slightly to remove bubbles. The first
piece of the mould you’ve just made should look something like the image on the
right.
TIP: Make sure there is a substantial amount
of plaster on top of the entire sculpt, if not this will create a weak layer of
plaster which may snap or break in the final stages of this process.
Leave
the plaster to dry for several hours, until cool and dry.

Step 8
Once
dried, remove the box around the mould and flip over being gentle not to crack
or smash the plaster. Now removing the clay from the plaster and the sculpture,
hopefully the soap mixture you applied will help this step. Once removed,
scrape carefully any excess clay off your sculpt.
TIP: To
remove the majority of the clay I usually get a paint brush and water, wiping
around the seams and smoothing down the entire sculpt from clay.


Step 9
The
sculpt is now clean from most of the clay, it is time to create the second half
of the mould. Again boxing up around the plaster cast so far and making it
water tight again by adding clay around the seams (like in Step 5). DO NOT
forget to apply the soap solution before adding the plaster solution.

Step 10
Now
the second part of the cast is dry, it is time to pull apart the separate
parts. If you have created the large clay points in Step 5, separating the halves
will be easier. I placed a chisel between the two moulds and gently part them.
You will then be left with two separate halves of your mould with the sculpture
inside, like the image above.

Step 11
Now
remove all of the plasticine from the mould that your sculpture may have left,
to give you clean looking moulds, like mine above.
TIP: Do not worry
if pieces of your mould fall off or apart, if they are large pieces simply glue
the pieces back on with some super glue/ two part glue. If an important small
part falls off like the eye socket, get some Millieput and simply re-sculpt it
back onto the mould.

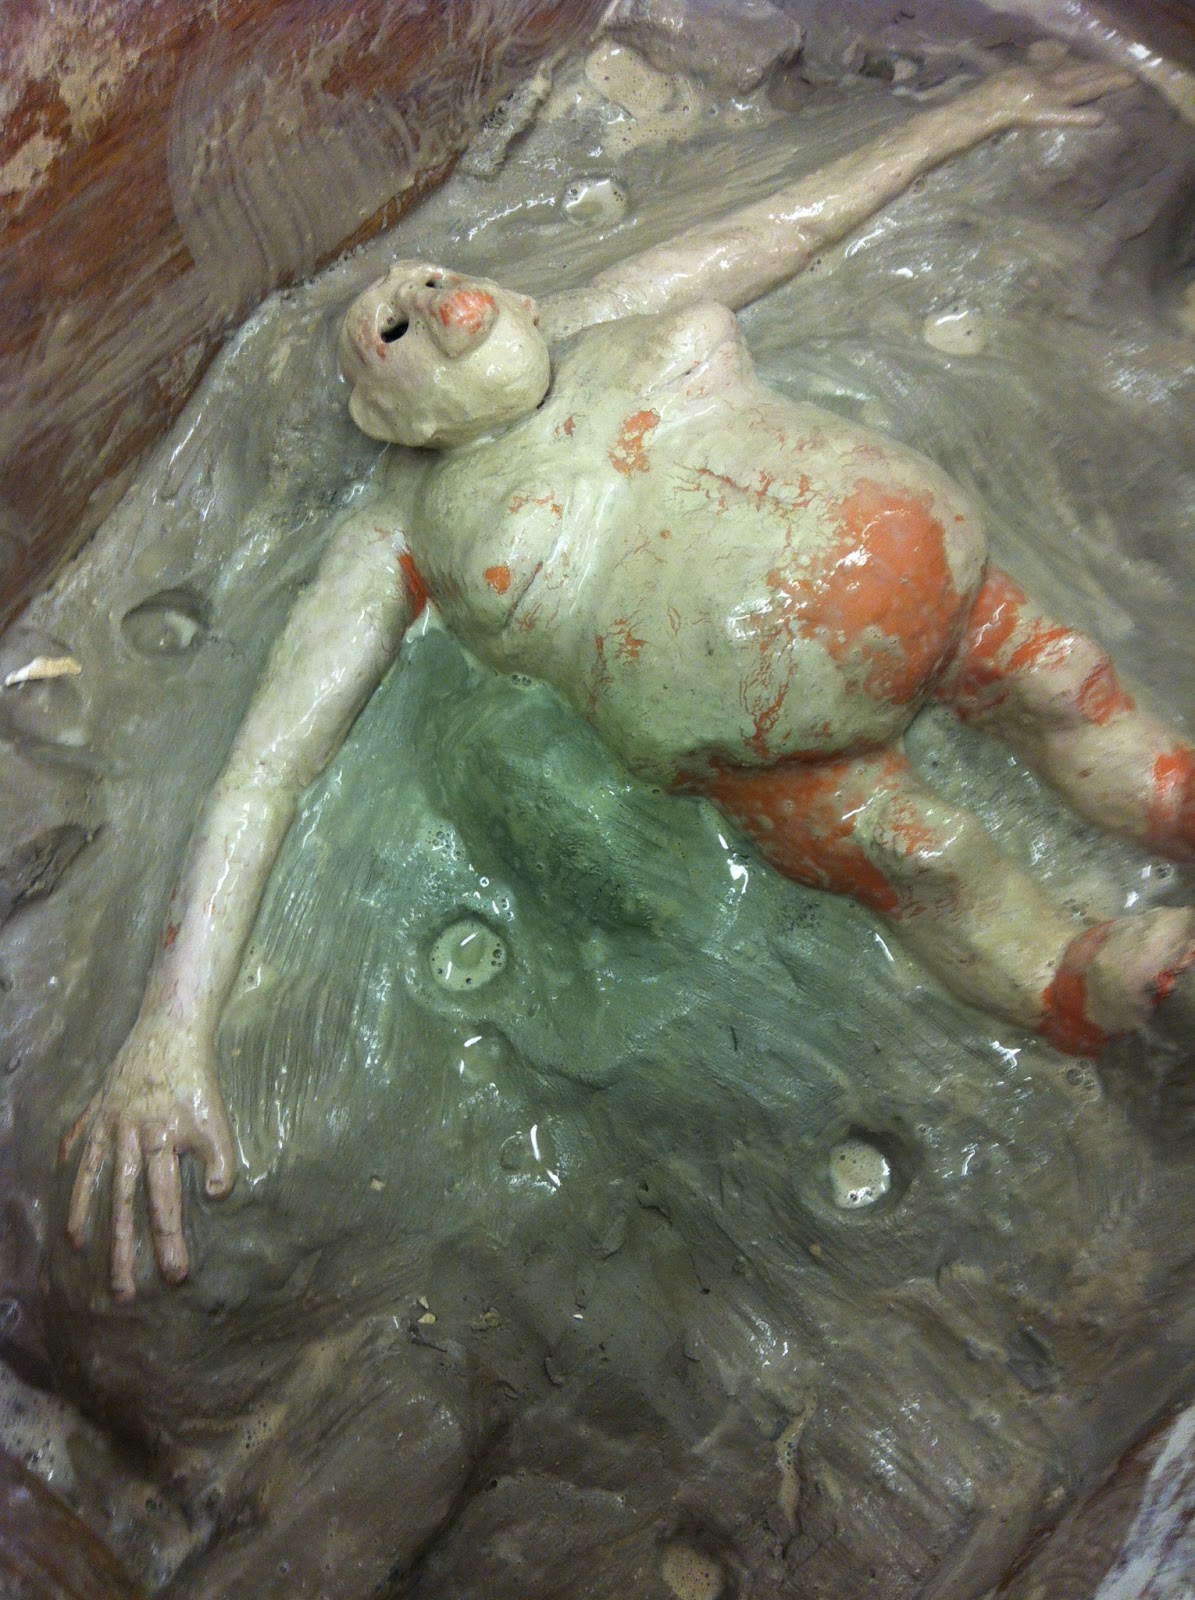
Unfortunately
not everything can make it through the moulding process, like my sculpt of
Domovoi here. I had to scrape his head out of the mould. The mould you produce
will look exactly like your sculpture with any luck.

Step 12
Now
the mould is complete, it is time to check that your armature correctly fits
into your mould. Or if you haven’t got an armature already, this is a perfect
time to create one ready for the next part of the puppet making process.

Step 13
The
last step is to place all your mould into a dryer or dry area, and leave for a
couple of days. To make sure all the moisture is removed ready for Part 2
(Adding the foam rubber to your moulds)
WARNING: If you do NOT leave the moulds to dry this may break or even destroy the oven in Part 2, so Step 13 is VERY important!!!!
Hopefully
I have explained each step well enough for everyone to be able to create their
own moulds. Any questions please ask away :)
And stay tuned for ....
PART 2 : Foam rubber